A Mail Merge is a way to create a document once and then easily recreate the document with alternate information in specified locations. For example, the most commons use of a Mail Marge is a letter that is being sent to multiple recipients. The contents or body of the letter is the same for everyone; however the recipient information needs to be customized for each letter.
A mail merge allows you to create a letter for 500 recipients as easily (or easier) than you could create one for 5 recipients.
- Create the letter that you intend to use in Microsoft Word
- Create a spreadsheet that contains all the information that needs to be substituted.
For example; First Name, Last Name, Company, Address, etc…It may look something like this –
Suffix FName LName Company Street City State Zip Ms. Jane Smith ABC Corp 123 C St Portland ME 04101 Mr. John Smith 123 Inc 456 N St Portland ME 04101 Hints: All column headings should be a single word, The ‘Zip’ column may need to be specially formatted if the zip codes you are using start with ‘0’. This can be done under the cell formatting options, Remember the name and location of the spreadsheet when you save it
- With your letter open and your spreadsheet closed, navigate to the ‘Mailings’ tab (5th from the left) at the top of Microsoft Word toolbar (or Ribbon).
Choose the ‘Select Recipients’ option (4th from the left)
Choose ‘Use Existing List…’ (Second option). This will open another window
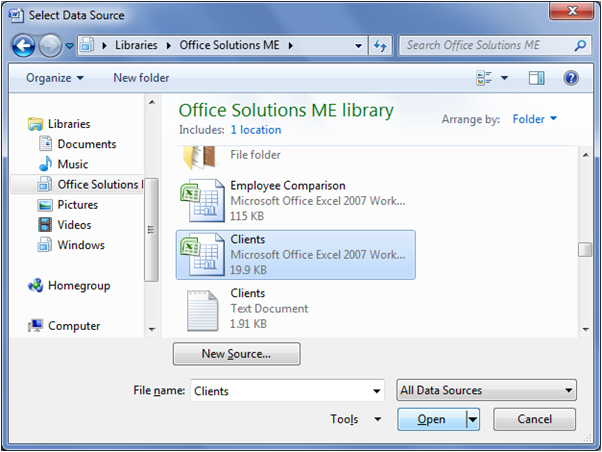
- Navigate to the location where you stored your spreadsheet
Select your saved spreadsheet, Click ‘Open’

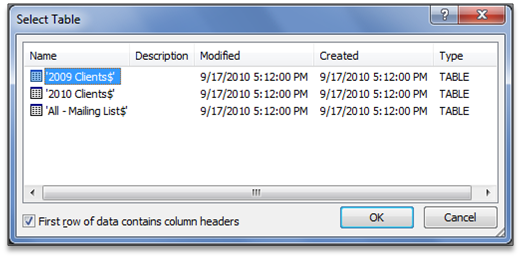
- This will give you a list of the sheets available in that file, generally yours will be ‘Sheet 1’ unless you named it otherwise

- You now have some additional options available to you on the ‘Mailing’ tab on the top of the page
One of the new options is ‘Insert Merge Field’ this should give you a list of all of the column headings in your spreadsheet.

- Now you can insert the desired fields from your spreadsheet into your letter template by clicking on them
Here is an example;
Hi «Fname»,
I hope business is going well at «Company»!Hint: Any blank fields in your spreadsheet will be skipped in your letter
- Once you are done adding your merge fields, you can ‘preview results’ or ‘Finish & Merge’
Both options are also found on the ‘Mailings’ tab toward the right side of the menu
Hopefully this quick Mail Merge 101 tutorial helps you become more efficient and effective!
For more help with your mailings or any other word processing and administrative functions, contact Office Solutions ME!

